This document describes how to get started with Sencha Touch. It explains the basic steps for using Sencha Touch to create Web applications for touch-based devices. Additionally, it provides detailed steps for creating the GeoTweets example application, which is one of the example applications included in the Sencha Touch release package.
This document is written for Web developers who want to quickly get started using Sencha Touch to create Web applications for touch-based devices. It assumes you have downloaded the Sencha Touch libraries. have a properly installed and configured Web server, and are familiar with Web application development and concepts such as JavaScript, HTML, Cascading Style Sheets (CSS), Web servers, and so forth.
This document contains the following sections:
Sencha Touch is a JavaScript framework for creating Web applications targeted to touch-based devices. With Sencha Touch, you can use the skills you already possess to create an elegant and consistent user experience with minimal effort. Sencha Touch makes use of technologies such as HTML and CSS to provide native-quality application experiences without needing plugins.
To use Sencha Touch to create JavaScript applications for touch-based devices, follow these main steps:
In the editor of your choice, create the HTML file for your application. For an example of an application HTML file, see Detailed Steps: Creating the HTML File.
The application HTML file is where you specify links to:
Sencha recommends that you:
Save the HTML file with a logical name such as myapp.html. After you have finished writing the application and have put it on your local Web server, you will point your browser to this file name on your local Web server in order to view and test your application.
To test your application:
When you are done testing your application, change the application's HTML file to point to the production version of the Sencha Touch library. To do so:
	<!-- Sencha Touch JS -->
	<script type="text/javascript" src="../../sencha-touch-debug.js"></script>
When your application is ready for production, simply put a copy of the application's source files and any other files the application references on your production Web server.
This section expands on the main steps described in the previous section by walking you step-by-step through the process of creating a Sencha Touch application. This complete source for the application, GeoTweets, can be found in the /examples/guide subdirectory in the Sencha Touch release package.
The GeoTweets application demonstrates how easy it is to use Sencha Touch to create a simple yet powerful application. The application:
The first step in creating a Sencha Touch application is to create an HTML file that links to Sencha Touch and application CSS files, the Sencha Touch library, and the application JavaScript file.
The GeoTweets application HTML file is index.html and its contents are as follows:
 <!DOCTYPE html>
 <html>
 <head>
     <meta charset="utf-8">
     <title>GeoTweets</title>

	 <!-- Sencha Touch CSS -->
	 <link rel="stylesheet" href="../../resources/css/sencha-touch.css" type="text/css">

	 <!-- Custom CSS -->
	 <link rel="stylesheet" href="css/guide.css" type="text/css">

	 <!-- Google Maps JS -->
	 <script type="text/javascript" src="http://maps.google.com/maps/api/js?sensor=true"></script>

	 <!-- Sencha Touch JS -->
	 <script type="text/javascript" src="../../sencha-touch-debug.js"></script>

	 <!-- Application JS -->
	 <script type="text/javascript" src="src/index.js"></script>


 </head>
 <body></body>
 </html>
The HTML file for the GeoTweets application links to five files:
This document does not describe the CSS file in detail because its properties are straight-forward and should be self-explanatory. Additionally, this document assumes you are familiar with Web application concepts such as CSS.
The debug version of the library is not compressed and it contains documentation. This can be helpful if an error occurs, as it allows you to see exactly where in the library the error occurred. Normally, in production, you would use sencha-touch.js, which is the version of the library that is optimized for production.
NOTE: Notice that the <body> tag in the HTML file is empty. This is because Sencha Touch automatically generates the page content via JavaScript.
Once you have created the HTML file, you are ready to create the application JavaScript file. This section shows the entire contents of the application JavaScript file and breaks down the creation of the application code into steps.
The GeoTweets application JavaScript file is index.js and its contents are as follows:
Ext.setup({
    tabletStartupScreen: 'tablet_startup.png',
    phoneStartupScreen: 'phone_startup.png',
    icon: 'icon.png',
    glossOnIcon: false,
    onReady: function() {
        var timeline = new Ext.Component({
            title: 'Timeline',
            cls: 'timeline',
            scroll: 'vertical',
            tpl: [
                '<tpl for=".">',
                    '<div class="tweet">',
                            '<div class="avatar"><img src="{profile_image_url}" /></div>',
                            '<div class="tweet-content">',
                                '<h2>{from_user}</h2>',
                                '<p>{text}</p>',
                            '</div>',
                    '</div>',
                '</tpl>'
            ]
        });

        var map = new Ext.Map({
            title: 'Map',
            getLocation: true,
            mapOptions: {
                zoom: 12
            }
        });

        var panel = new Ext.TabPanel({
            fullscreen: true,
            cardSwitchAnimation: 'slide',
            items: [map, timeline]
        });

        var refresh = function() {
            var coords = map.geo.coords;

            Ext.util.JSONP.request({
                url: 'http://search.twitter.com/search.json',
                callbackKey: 'callback',
                params: {
                    geocode: coords.latitude + ',' + coords.longitude + ',' + '5mi',
                    rpp: 30
                },
                callback: function(data) {
                    data = data.results;

                    // Update the tweets in timeline
                    timeline.update(data);

                    // Add points to the map
                    for (var i = 0, ln = data.length; i < ln; i++) {
                        var tweet = data[i];

                        // If the tweet is geo-tagged, use that to display marker
                        if (tweet.geo && tweet.geo.coordinates) {
                            var position = new google.maps.LatLng(tweet.geo.coordinates[0], tweet.geo.coordinates[1]);
                            addMarker(tweet, position);
                        }
                    }
                }
            });
        };

        // These are all Google Maps APIs
        var addMarker = function(tweet, position) {
            var marker = new google.maps.Marker({
                map: map.map,
                position: position
            });
        };

        map.geo.on('update', refresh);

        var tabBar = panel.getTabBar();
        tabBar.addDocked({
            xtype: 'button',
            ui: 'mask',
            iconCls: 'refresh',
            dock: 'right',
            stretch: false,
            align: 'center',
            handler: refresh
        });

    }
});
The JavaScript code in the GeoTweets application file defines:
Note: In this application, components are created with the following syntax:
    var objectName = new Ext.ComponentName({
        objectDefinition
    });
where:
The following sections walk you through the steps for creating the application script.
In the editor of your choice, begin writing the application script. The first lines of JavaScript code for the application file (index.js) are as follows:
Ext.setup({
    tabletStartupScreen: 'tablet_startup.png',
    phoneStartupScreen: 'phone_startup.png',
    icon: 'icon.png',
    glossOnIcon: false,
    onReady: function() {
The Ext.setup method sets up a page for use on a touch-enabled device. It allows you to set various start up properties and behaviors for your application. For detailed information on the Sencha Touch API, including this method, see the Sencha Touch API Documentation.
The GeoTweets application code specifies the following start up properties:
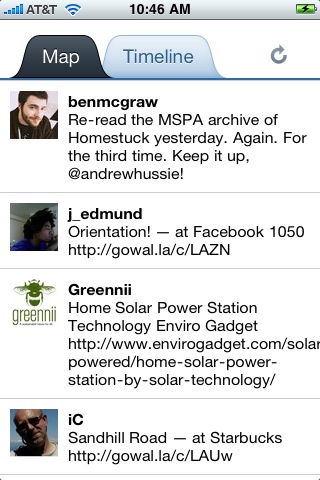
The timeline card displays tweets in a list view. It is created as an Ext.Component, which is a generic shell for data and other components or widgets.
The JavaScript for the timeline card Ext.Component is as follows:
    var timeline = new Ext.Component({
        title: 'Timeline',  // Name that appears on this tab
        cls: 'timeline',    // The CSS class. Lets you style elements on the timeline.
        scroll: 'vertical', // Make it vertically scrollable
        tpl: [              // Set up a template to display tweet data
          '<tpl for=".">',
            '<div class="tweet">',
              '<div class="avatar"><img src="{profile_image_url}" /></div>', // Tweeter's picture
              '<div class="tweet-content">',
                '<h2>{from_user}</h2>',       // Tweeter's name
                '<p>{text}</p>',              // Tweeter's message
              '</div>',
            '</div>',
        '</tpl>'
       ]
    });
The timeline card Ext.Component:
This template updates the timeline card component with data from Twitter. The template tags, profile_image_url, from_user, and text are enclosed in curly braces ({}) and match the JSON format in which Twitter data is stored. The Ext.util.JSONP.request method retrieves the data.
In the application CSS file, guide.css, you can set and change the way the classes defined in the template code appear on device screens.
The following figure shows a typical timeline card that the application might display:
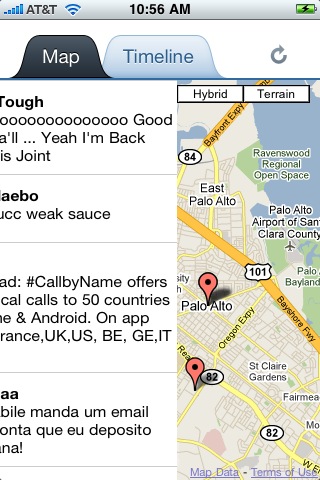
The map card displays a map of the nearby tweets.
The JavaScript for the map card, which is an Ext.Map component, is as follows:
    var map = new Ext.Map({
        title: 'Map',        // Name that appears on this tab
        getLocation: true,   // Gets user's current location
        mapOptions: {        // Used in rendering map
          zoom: 12
        }
    });
Ext.Map creates a Google Map component by wrapping a Google Map in an Ext.Component. As with other Ext components, the Ext.Map component defines properties that control the appearance of the card:
Ext.Map also specifies mapOptions which are used in rendering the map. The mapOptions you set as part of an Ext.Map component are passed directly to the Google Map object. For more information on these options and the Google Maps API, see the Google Maps API Documentation.
In this example, the zoom option, which specifies the initial map zoom level, is set to 12.The following image shows the map card:

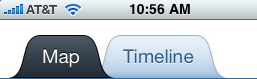
Ext.TabPanel is a container component that holds the objects that the application displays. In this case, the TabPanel component contains the two previously-defined components timeline and map, automatically adds tabs with the specified titles (Timeline and Map) above the cards (components), and provides the logic for switching between the cards.
The Ext.TabPanel application code is as follows:
    var panel = new Ext.TabPanel({
        fullscreen: true,            // The panel will take up the full rather than partial screen
        cardAnimation: 'slide',       // Special effect for switching between cards
        items: [map, timeline]       // Components (cards) that the tabs correspond with
    });
The TabPanel card component defines three properties that control the appearance of the tab panel:
The following image shows the effect of switching between the cards in the application:
There are additional transition effects you can use for changing cards, such as flip, wipe, cube, pop and so forth. For more information, see the API documentation for the Ext.anims class.
The refresh function is called when the application starts up and again whenever the refresh button (which you define in a later section) in the application is tapped. The function makes an external request to gather data from Twitter. It also calls an addMarker function that gets the geographic data for adding markers that show tweeter locations on the map.
The corresponding code from the application file is as follows:
    var refresh = function() {                           // Define the refresh function

      var coords = map.geo.coords;                       // Define a coords variable from the maps geolocation
      Ext.util.JSONP.request({                           // Make an external call using JSONP
        url: 'http://search.twitter.com/search.json',    // to this URL
        callbackKey: 'callback',                         // Set the required Twitter callback parameter
        params: {
          geocode: coords.latitude + ',' + coords.longitude + ',' + '5mi', // Get lat, long, and radius
          rpp: 30                                        // Number of tweets per page
        },
      callback: function(data) {                         // Provide structure to hold data from Twitter callback
        data = data.results;                             // Hold Twitter info in variable called data
        timeline.update(data.results);                   // Update the tweets in timeline

        for (var i = 0, ln = data.length; i < ln; i++) { // Loop to add points to the map
          var tweet = data[i];                           // Get data for a single tweet

          if (tweet.geo && tweet.geo.coordinates) {      // If the tweet is geo-tagged, use that to display marker
            var position = new google.maps.LatLng(tweet.geo.coordinates[0], tweet.geo.coordinates[1]);  // Get coords
            addMarker(tweet, position);                  // Call addMarker function with new data
          }
        }
      }
    });
  };
The Ext.util.JSONP.request provides an easy way to make a JSON call to Twitter. To it, you pass:
url: 'http://search.twitter.com/search.json',
	params: {
	          geocode: coords.latitude + ',' + coords.longitude + ',' + '5mi',
          rpp: 30
The specific parameters used to run a basic search for nearby tweets are:
Note The geocode and rpp parameters are specific to the Twitter Search API.
The callback function receives the data from Twitter and stores it in the data variable. It first updates the timeline card with a list of the tweets. Recall that the template defined in the timeline card component looks for {profile_image_url}, {from_user}, and {text}, all of which are defined in the results.
The application code for the callback function is as follows:
callback: function(data) {
        data = data.results;
        timeline.update(data.results);
The following is an example of the raw data that comes back from Twitter:
{"results":
[{"profile_image_url":""http://a1.twimg.com/profile_images/704555348/boat3_normal.jpg...
"from_user":"jonathanjulian",...
"text":"@agnellvj have a look at the most intense #extjs book to be published do far!",
...
The for loop goes through the Twitter data one tweet
at a time and checks for geographic tagging. If a tweet is geo-tagged,
then the latitude and longitude coordinates are stored in the position
variable and passed to the addMarker function, which adds the tweet
to the map.
The corresponding code is as follows:
 for (var i = 0, ln = data.length; i < ln; i++) {
           var tweet = data[i];

           if (tweet.geo && tweet.geo.coordinates) {
             var position = new google.maps.LatLng(tweet.geo.coordinates[0], tweet.geo.coordinates[1]);
            addMarker(tweet, position);
The addMarker function adds tweets to the map based on location. The logic in this function deals almost entirely with the Google Maps API and is not specific to Sencha Touch.
The corresponding code from the application file is as follows:
   var addMarker = function(tweet, position) {        // Define addMarker function
            var marker = new google.maps.Marker({          // Define variable to hold marker data
            map: map.map,
            position: position,
        });
    }
The refresh function runs each time the Geolocation utility within the map is updated. Because you set getLocation: true on the Map component, refresh runs immediately after the page has loaded and has retrieved the application user's location.
The corresponding code, which specifies when refresh runs is as follows:
map.geo.on('update', refresh);
Note: The Twitter API often serves cached data and refreshes periodically, which means that new tweets may not always display each time a user taps the refresh button.
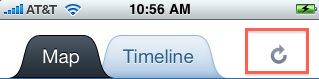
To add the custom refresh button to the Tab Bar, first retrieve the TabBar portion of the TabPanel with the following code:
var tabBar = panel.getTabBar();
The following image shows the Tab Bar.
This section describes a technique for creating a custom refresh button as a docked item on the GeoTweets application tab bar.
To add a button to the TabBar, create a component by passing an object directly to the addDocked function. By using an xtype property in this object, you can create the new button on the fly, inline with the code. This functionality is found throughout the library. Any place where you would typically insert a component or widget, you can also use a flat object with the configuration properties and an xtype property. While using this technique is a fast way to generate interfaces, it can also be less maintainable.
    tabBar.addDocked({
        xtype: 'button',          // Specifies an instance of the button class
        ui: 'mask',              // Appearance, for example, "light", "dark", etc.
        iconCls: 'refresh',       // CSS class for the button
        dock: 'right',            // Puts the new button at the right of the tab bar
        stretch: false,           // Prevents the button from stretching to full height of tab bar
        align: 'center',          // Centers the button vertically within the tab bar
        handler: refresh          // Refreshes the current card when users tap
    });
There are several properties that control the layout of docked objects. The GeoTweets application uses the following properties:
Additionally, the handler function is called when an application user taps the button. In this application, we specify that the refresh function is called when the button is tapped.
The following image shows the button you defined:
Once you have finished writing and have saved the application JavaScript file you are ready to test it. To do so, follow the directions in Test the Application.
When you are done testing your application, follow the directions in Update the Application for Production to change from the debug to the production version of the Sencha Touch library.
When you are ready to release your application for general use, follow the directions in Put the Application into Production.
As you can see, creating JavaScript Web applications with Sencha Touch is quick and simple! The Sencha Touch release package includes many other examples you can browse and learn from.
For further information on the topics covered in this document, see:
This file last updated July 26, 2010.