This is a secondary source, after you have read the information at Confluence.
Three
Steps! 1. Group Policy 2. SVN
(options and software packages) 3. Registering
computer(s) and Setup
Most information is with help from Melvin Wong (much is copied directly
from his emails). Other people such as Scott Wang, Alan Rothenbush
etc... helped but all mistakes are mine.
Group Policy
If two ou's have the same local user or policy with different settings,
the one deeper in the tree takes precedence- e.g. a faculty policy overrides the
departmental policy.
These policies are applied during the initial setup and during maintenance
or reboot. Manually run gpupdate by entering 'cmd' at Start menu,
right click to run as admin.
In Group Policy Management Editor (access by right clicking Group Policy
Management, edit)
Change Default Email Notifications etc
Computer Configuration/Preferences/Windows Settings/Environment
Disable
remote access for a specific 'local' user
Computer Configuration -> Policies -> Windows Settings ->
Security Settings -> Local Policies -> User Rights Assignment
-> Deny log on through Remote Desktop Services
***(But should we not do this for all local users, because if we want
to admin the computer remotely we should login with our SFU ID (which
will have admin access).
Change to your subnet:
Computer
Configuration/Policies/Administrative Templates/Network/Primary DNS
Suffix
Disable Roaming Profiles (Only if your dept does not use roaming profiles):
Computer Configuration/Policies/Administrative Templates/System/User
Profiles/Only Allow Local User Profiles.
If you enable the "Only allow local user profiles" setting, roaming
profiles are disabled.
CHANGE NexGEN Unit Path (to find the options files etc):
Computer Configuration/Preferences/Windows Settings/Environment
Variable/Variable (NexGEN UNITPATH
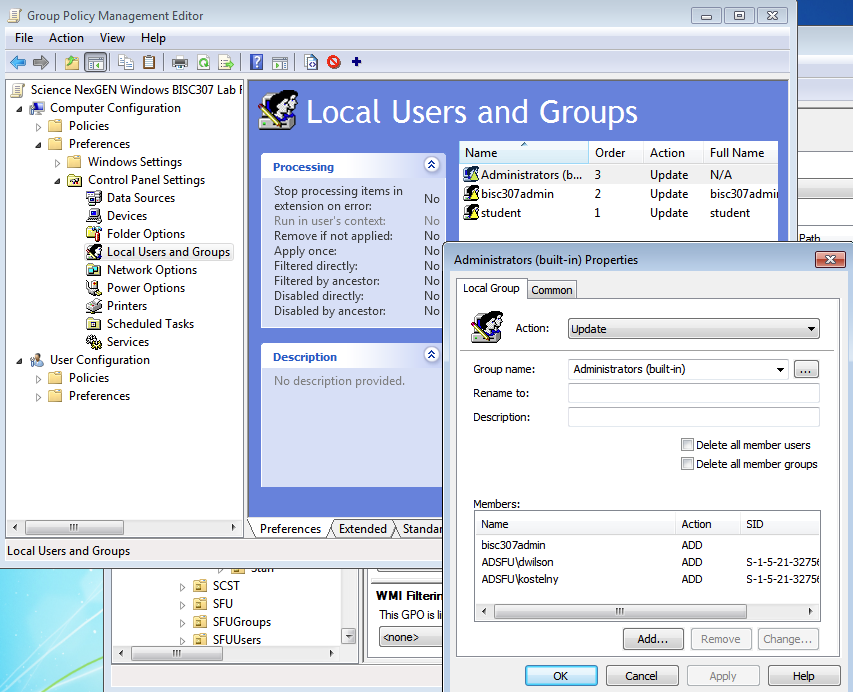
Create/Edit/CHANGE PASSWORDS of Local Users:
Computer Configuration/Preferences/Control Panel Settings/Local Users and
Groups
There is a default account called 'nexgenadmin' in the NexGEN Reference Preferences GPO, it is important to change the password on it.
Click on this image for giving local (built-in) and ADSFU accounts administrative access (I first created a group for built-in Admins THEN added the accounts)

Click on this image for giving local (built-in) administrative accounts remote access

Mapping Drives
User Configuration/Preferences/Windows Settings/Drive Maps
(right click, new mapped drive)
\\sphinx.sfu.ca\%Username%
Click on this image...

------------------
SVN
Create
a folder on any drive with at least 150MB of space. The nice thing
about TortoiseSVN is that it has shell integration so then right click
on the folder and select "SVN Checkout...". That is where you
would enter "https://mirror.its.sfu.ca/svn/projects/nexgen/"
as the URL for the repo.
system/<YourOU>/scripts/options.php
file, specify "Trend5" as the trend server name. Also add your Trend
container.
system/<YourOU>/wpkg/
hosts.xml & profiles.xml
Add to hosts.xml
<!-- NexGEN Skeleton Unit Path - installs nexgen standard stuff and
adds the skeleton profile too. -->
<host adou="OU=Faculty
Machines,OU=NexGEN,OU=BISC,DC=ad,DC=sfu,DC=ca">
<profile id="nexgen_standard"
/>
<profile id="nexgen_extras"
/>
</host>
<!-- install jmp specific computer(s) -->
<host
name="jkchrist-office.+" profile-id="jmp" />
Add to profiles.xml
<profile id="jmp" >
<package package-id="jmp" />
</profile>
------------------
Registering computer(s) and Setup
Here are some notes for using NexGEN after the initial setup has
been done. You need to have access to Unified Registration and Men &
Mice.
NexGEN on a Mac (using a shared virtual drive)
VirtualBox recommends creating a 25GB hard drive- this only allows about a
GB of space or less after NexGen installs Office/Reader/ etc etc. So I
suggest increasing it if you plan on installing additional tools (I
installed Remote Server Administration Tools (RSAT, follow this link for download, install & activating the GPO) to access the Group
Policy Management Console). I suggest 40GB or more unless you do not plan on
adding Microsoft Office and other software packages.
Settings/System (Motherboard tab): Boot Order: Check 'Network' (leave
Network below 'Hard Disk')
Settings/Network: use a 'Bridged Adapter' (and copy the MAC address found
in 'Advanced')
Now go to Unified Registration.
https://wake.its.sfu.ca/admintools/unified-registration.php
Enter the MAC address with standard format using colons-
08:01:37:AD:56:61).
Enter the Hostname (I suggest a standard suffix, such as -nexgen and -vm
e.g., b8230-nxg-vm). DO
NOT use a hostname longer than 15 characters!
Change the "Zone DDNS/ Boot Server" from 'Default' to "NexGen WDS".
Browse to your Active Directory OU (note you can click on grey triangles
to open the sub- ou's.). If you want to test it you may use my basic setup
under BISC/NexGEN/Staff Machines (Roaming profiles are turned off, you
will be able to log on with your SFU ID.)
When you boot the machine choose the first, default, choice (Windows
Deployment Services) (if there are many choices and 'Reboot' is the first
you have not waited long enough for the DNS- it takes a couple of
minutes). Then you go to a DOS like screen to choose the operating
system (default for Win7 64bit), and then a Microsoft screen to choose the
image.
It takes about 8 reboots and a couple of hours or less (on my congested
and sometimes slow network here).
If a person cannot log on to the NexGEN computer they may need to synch
their AD password:
https://cgi.sfu.ca/~account/ActiveDirectoryInit.cgi
Running
Maintenance/ Updating Policies on a computer (From Melvin)
-
If it's a single computer you are on and you want to start maintenance
right away, you can enter the following command.
c:\nexgen\tools\sysinternals\psexec.exe
-accepteula -hsi c:\nexgen\launcher\ngs.cmd forcecopy
"operation=domaintenance"
Or
of you only want to run WPKG, it may not necessarily need a reboot.
c:\nexgen\tools\sysinternals\psexec.exe
-accepteula -hsi c:\nexgen\launcher\ngs.cmd forcecopy "operation=wpkg"
This
will cause your system to reboot and run maintenance (Windows Updates,
critical updates, WPKG's).
-
It can be forced in your options.php by setting,
function
unitPathForcedMaintenanceMode() { return true; }
This
will cause the all systems in that unit path to run maintenance every
time the system is restarted.
-
You can also run c:\nexgen\launcher\maintenance.cmd
RSAT, follow this link for download, install & activating the GPO*
To access GPO after installing RSAT-
Click Start, click Control Panel, and then click Programs.
In the Programs and Features area, click Turn Windows features on or off.
If you are prompted by User Account Control to allow the Windows Features dialog box to open, click Continue.
In the Turn Windows features on or off dialog box, expand Remote Server Administration Tools, and then expand Feature Administration Tools.
To install the GPMC, select the Feature Administration Tools check box, and then select the Group Policy Management Tools check box.
Also install -> AD DS and AD LDS Tool


